Cheese Stuffed Biscuits
Savor the World.
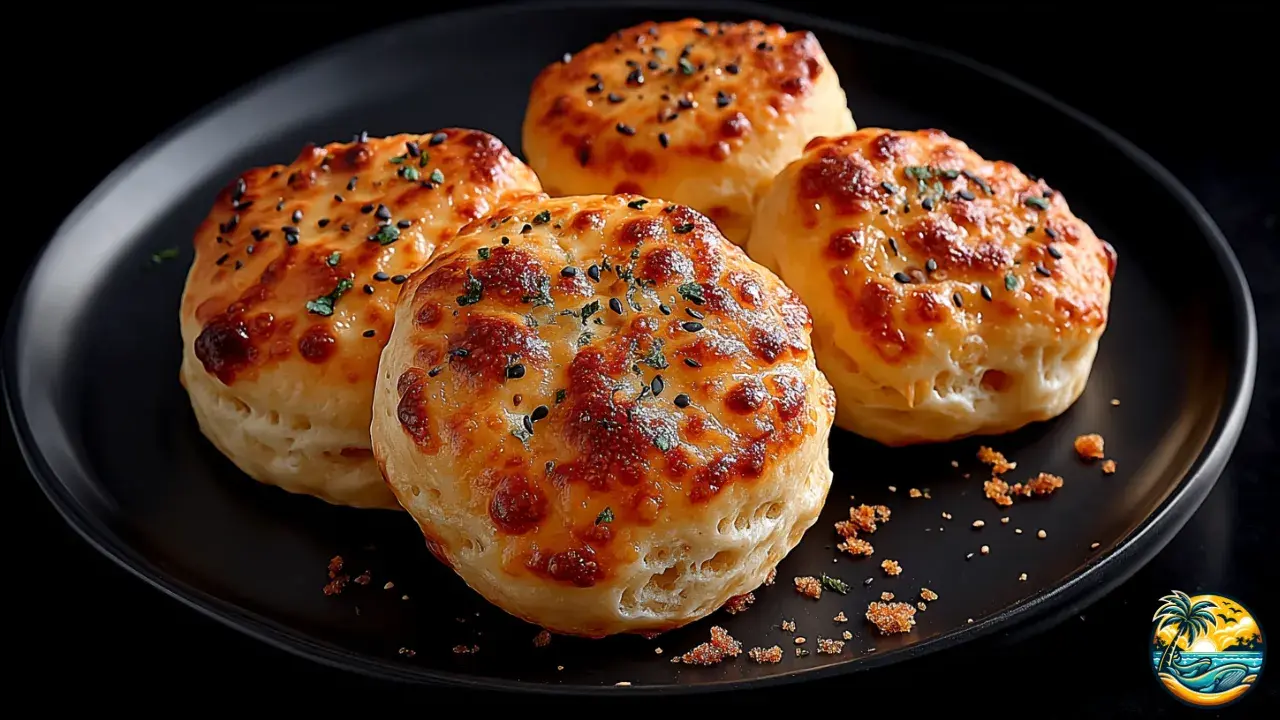
Cheese Stuffed Biscuits
Who doesn’t love biscuits and cheese? Now imagine putting them together into one delicious appetizer—a soft, fluffy biscuit filled with gooey melted cheese, with an irresistible aroma and an amazing flavor. Here we bring you these Cheese Stuffed Biscuits, golden and pillowy, ready to make you look like a true gourmet chef with your friends and family. Sounds good, right? Then let’s make them!

Cheese Stuffed Biscuits
Servings:8 biscuits
Prep Time: 15 minutes
Cook Time: 18 minutes
Total Time: 33 minutes
Ingredients:
- 2 cups (240 g) all-purpose flour
- 1 tablespoon (15 g) baking powder
- 1/2 teaspoon (3 g) salt
- 1 teaspoon (5 g) sugar
- 1/2 cup (115 g) unsalted butter, cold and cubed
- 3/4 cup (180 ml) cold buttermilk
- 8 cubes of mozzarella or cheddar cheese (about 1 oz / 28 g each)
- 2 tablespoons (30 g) melted butter
- 1 teaspoon (2 g) fresh parsley, chopped
Necessary equipment:
- Large mixing bowl
- Measuring spoons
- Rolling pin or your hands to flatten the dough
- Baking sheet
- Parchment paper or silicone baking mat
- Pastry brush
- Biscuit cutter
See 5 variations of the recipe at the end.

You might also be interested in:
Did you know?
The famous “cheese pull” isn’t magic—it’s science. Cheeses like mozzarella have more intact casein proteins, which form long stretchy strands when heated. That’s why, if you serve these 5 to 10 minutes after baking, you’ll get the most dramatic cheese stretch—and epic food photos.

Instructions:
- Let’s get started! Preheat your oven to 425 °F (220 °C). Don’t skip this step—having the oven nice and hot when the biscuits go in makes the cold butter melt quickly, creating steam that gives you that fluffy, layered texture everyone loves. Line a baking sheet with parchment paper or a silicone mat, not just to prevent sticking, but also to save yourself the headache of scrubbing the pan later.
- In a large bowl, combine the flour, baking powder, salt, and sugar. Mix well so the baking powder and salt are evenly distributed throughout the dough.
- Add the cold cubed butter right away. Using your hands or a pastry cutter, work it in gently until the mixture feels sandy with small visible chunks of butter. You don’t want it completely blended—the little butter pieces are what melt in the oven and give you that classic, flaky biscuit texture.
- Now pour in the buttermilk, but do it gradually, mixing gently with a spatula or wooden spoon. Don’t overmix, or your biscuits will turn out tough. The dough should come together and feel slightly sticky but still easy to handle.
- Transfer the dough to a lightly floured surface. With your hands or (better yet) a rolling pin, roll it out gently until it’s about 1/2 inch (1.2 cm) thick. Don’t press too hard—just enough to shape it.
- Divide the dough into 8 equal portions. Now comes the fun part! Place a cube of cheese in the center of each piece and wrap the dough around it, sealing the edges well so the cheese doesn’t leak out in the oven. To shape them into biscuits, use a biscuit cutter or, in a pinch, a round glass. (Pro tip: biscuit cutters are cheap—mine cost less than 2 bucks!)
- Arrange the biscuits on the prepared baking sheet, leaving a little space between them. If they’re too close, they’ll bake into each other as they rise. With enough space, they keep their nice round shape.
- Time to bake! Place them in the oven for 16 to 18 minutes, or until the tops are golden brown. That golden color tells you the butter has melted and the flour is fully baked. Every oven is a bit different, so start checking around the 15-minute mark.
- Take them out of the oven and, while still warm, brush the tops with melted butter. This gives them that irresistible shine and enhances the flavor, basically making them even more tempting. Since these are savory biscuits, sprinkle on some fresh parsley for a pop of color and aroma.
- And that’s it! Pretty easy, right? Let them cool for just a few minutes and serve them while the cheese is still gooey and melted in the center. When you break them open, you’ll get the perfect combo of a golden crust, fluffy crumb, and melty cheese inside. Pure comfort food!


Ingredient Substitutions
- Buttermilk: You can replace it with 3/4 cup (180 ml) of milk mixed with 2 teaspoons (10 ml) of white vinegar or lemon juice; let it sit for 5 minutes.
- All-purpose flour: If you don’t have it on hand, swap it for 2 cups (240 g) of self-rising flour, but omit the baking powder and salt.
- Butter: If you’re not using butter, replace it with refined coconut oil in a 1:1 ratio—just make sure it’s kept cold.
- Mozzarella cheese: You can switch it out for Oaxaca, provolone, or mild cheddar cheese, all of which melt and stretch beautifully.
- Parsley: If you don’t have it, simply use green onion or cilantro instead.

Prep Tips:
- Keep everything cold: With biscuits, colder is always better. Chill your butter cubes and even the mixing bowl in the freezer for 10 minutes before starting.
- Don’t overmix: This one really matters—mix just until combined. Overworking the dough will make your biscuits tough.
- Fold the dough: When rolling it out, fold it into thirds and repeat 2 or 3 times. This gives you taller biscuits with more flaky layers.
- Seal the cheese well: Be sure to pinch the dough closed so no melted cheese leaks out in the oven.
Nutritional Information (per serving):
- Calories: 265 kcal
- Protein: 7 g
- Healthy fats: 14 g
- Carbohydrates: 27 g
- Natural sugars: 2 g
- Fiber: 1 g
- Sodium: 410 mg

Storing & Reheating
- Refrigeration: Store in an airtight container for up to 3 days.
- Freezing: Wrap each biscuit in plastic wrap and place in a zip-top bag; they’ll keep for up to 2 months.
- Reheating in the oven: Bake at 350 °F (175 °C) for 6–8 minutes if refrigerated, or 12–14 minutes if frozen.
- Quick reheat: Use an air fryer at 320 °F (160 °C) for 4–6 minutes. Avoid the microwave, as it makes them too soft.
Story or Inspiration
These biscuits are born from the mix of a classic Southern favorite and today’s love for gooey, melted cheese. The idea is simple: take that flaky, buttery roll you love at brunch and tuck a heart of mozzarella inside that stretches when you break it open. It’s pure comfort food that doesn’t take much effort but gives you a big wow factor—perfect for sharing at home or posting on social media.

Frequently Asked Questions (FAQ)
- Can I use shredded cheese? Absolutely! Just pack 1 oz (28 g) into a compact ball and press it into the center—don’t forget to seal the dough well.
- Can I make the dough ahead of time? Yes, you can prepare it up to 24 hours in advance. Keep it chilled, then shape and bake straight from the fridge.
- Why is my cheese leaking out? Most likely, the dough wasn’t sealed tightly enough. Double-check the seams before baking.
- Can I make them without buttermilk? Yes, you can use the milk-and-vinegar mix, thinned yogurt, or even just milk. The flavor and texture change a little, but they’ll still be delicious.
- Are they good for brunch? Totally! They also work great as a savory breakfast, snack, or served alongside soups and salads.
Serving Suggestions
- A roasted tomato soup with a touch of basil—perfect for dipping your Cheese Stuffed Biscuits.
- A crisp arugula, apple, and walnut salad with a honey vinaigrette pairs beautifully.
- A garlic butter and hot honey dip for a sweet-and-spicy contrast.
- A refreshing berry lemonade or unsweetened iced tea with orange slices.
- A warm brownie topped with a scoop of vanilla ice cream to finish on a sweet note.
Recipe Variations
- Garlic-Herb: Mix 1 teaspoon garlic powder and 1 teaspoon Italian herbs into the flour; finish with garlic butter on top—you’ll thank me later.
- Jalapeño-Cheddar: For spice lovers, add 2 tablespoons of chopped jalapeños and use cheddar inside. So good!
- Everything Bagel: Sprinkle “everything bagel” seasoning on top before baking and fill with mozzarella.
- Caprese: Fill with mozzarella and a seedless cherry tomato, then finish with fresh basil leaves for an Italian twist.
And there you have it! We did it—a batch of delicious cheese-stuffed biscuits that are perfect as an appetizer, a side dish, or simply to satisfy a tasty craving. And the best part? As you saw, they’re really easy to make! So go ahead, share them with the people you love most, and happy cooking!

Tastes of La Paz.
Cheese Stuffed Biscuits
Servings:8 biscuits
Prep Time: 15 minutes
Cook Time: 18 minutes
Total Time: 33 minutes
Ingredients:
- 2 cups (240 g) all-purpose flour
- 1 tablespoon (15 g) baking powder
- 1/2 teaspoon (3 g) salt
- 1 teaspoon (5 g) sugar
- 1/2 cup (115 g) unsalted butter, cold and cubed
- 3/4 cup (180 ml) cold buttermilk
- 8 cubes of mozzarella or cheddar cheese (about 1 oz / 28 g each)
- 2 tablespoons (30 g) melted butter
- 1 teaspoon (2 g) fresh parsley, chopped
Necessary equipment:
- Large mixing bowl
- Measuring spoons
- Rolling pin or your hands to flatten the dough
- Baking sheet
- Parchment paper or silicone baking mat
- Pastry brush
- Biscuit cutter
Instructions:
- Let’s get started! Preheat your oven to 425 °F (220 °C). Don’t skip this step—having the oven nice and hot when the biscuits go in makes the cold butter melt quickly, creating steam that gives you that fluffy, layered texture everyone loves. Line a baking sheet with parchment paper or a silicone mat, not just to prevent sticking, but also to save yourself the headache of scrubbing the pan later.
- In a large bowl, combine the flour, baking powder, salt, and sugar. Mix well so the baking powder and salt are evenly distributed throughout the dough.
- Add the cold cubed butter right away. Using your hands or a pastry cutter, work it in gently until the mixture feels sandy with small visible chunks of butter. You don’t want it completely blended—the little butter pieces are what melt in the oven and give you that classic, flaky biscuit texture.
- Now pour in the buttermilk, but do it gradually, mixing gently with a spatula or wooden spoon. Don’t overmix, or your biscuits will turn out tough. The dough should come together and feel slightly sticky but still easy to handle.
- Transfer the dough to a lightly floured surface. With your hands or (better yet) a rolling pin, roll it out gently until it’s about 1/2 inch (1.2 cm) thick. Don’t press too hard—just enough to shape it.
- Divide the dough into 8 equal portions. Now comes the fun part! Place a cube of cheese in the center of each piece and wrap the dough around it, sealing the edges well so the cheese doesn’t leak out in the oven. To shape them into biscuits, use a biscuit cutter or, in a pinch, a round glass. (Pro tip: biscuit cutters are cheap—mine cost less than 2 bucks!)
- Arrange the biscuits on the prepared baking sheet, leaving a little space between them. If they’re too close, they’ll bake into each other as they rise. With enough space, they keep their nice round shape.
- Time to bake! Place them in the oven for 16 to 18 minutes, or until the tops are golden brown. That golden color tells you the butter has melted and the flour is fully baked. Every oven is a bit different, so start checking around the 15-minute mark.
- Take them out of the oven and, while still warm, brush the tops with melted butter. This gives them that irresistible shine and enhances the flavor, basically making them even more tempting. Since these are savory biscuits, sprinkle on some fresh parsley for a pop of color and aroma.
- And that’s it! Pretty easy, right? Let them cool for just a few minutes and serve them while the cheese is still gooey and melted in the center. When you break them open, you’ll get the perfect combo of a golden crust, fluffy crumb, and melty cheese inside. Pure comfort food!
Nutritional Information (per serving):
- Calories: 265 kcal
- Protein: 7 g
- Healthy fats: 14 g
- Carbohydrates: 27 g
- Natural sugars: 2 g
- Fiber: 1 g
- Sodium: 410 mg

Tastes of La Paz.