Mini Ghost Cheesecakes
Savor the World.
Mini Ghost Cheesecakes
Who doesn’t love cheesecake and who doesn’t love Halloween? So, these delicious cheesecakes are made not just to delight your taste buds but also your eyes, because they’re extra cute. Plus, they’re super easy to make, so you can whip them up without spending much time or effort—and you’ll totally shine at your Halloween table or parties. Let’s make them!

Mini Ghost Cheesecakes
Servings:12 mini cheesecakes
Prep Time: 25 minutes
Cook Time: 20 minutes
Total Time: 45 minutes
Ingredients
- 1 cup (100 g) crushed Graham crackers
- 2 tablespoons (28 g) melted butter
- 16 oz (450 g) cream cheese, room temperature
- 1/2 cup (100 g) sugar
- 2 large eggs
- 1 teaspoon (5 ml) vanilla extract
- 1/4 cup (60 ml) sour cream
- 1 cup (240 ml) heavy whipping cream
- 2 tablespoons (15 g) powdered sugar
- Mini chocolate chips or candy pearls for the ghost eyes
Needed Equipment
- Cupcake pan
- Cupcake liners
- Electric mixer
- Silicone spatula
- Piping bag with a round tip
See 5 variations of the recipe at the end.
You might also be interested in:
Did You Know?
Cheesecakes are so old that, back in Ancient Greece, they were served as an energy boost for Olympic athletes. Who would’ve thought that centuries later we’d be topping them with whipped cream ghosts for Halloween?

Instructions
- So here we go! Preheat your oven to 325 °F (163 °C). While the oven warms up, place cupcake liners in your pan. This helps in two ways: first, the cheesecakes won’t stick, and second, they’ll look much nicer when serving—trust me, presentation counts!
- Now, in a small bowl, mix the crushed Graham crackers with the melted butter until the texture looks like wet sand—you’ll notice it right away. Divide the mixture into the cupcake liners and press it down firmly with the back of a spoon to create a solid base that will hold the filling.
- In a large bowl, beat the cream cheese with the sugar until smooth and lump-free (it’ll look delicious already). Add the eggs one at a time, mixing only enough to incorporate—seriously, don’t overbeat. Finally, mix in the vanilla and sour cream, which will give it that extra creamy flavor.
- Pour the cheesecake batter over the crusts. Fill each liner about 3/4 full, leaving just a little space at the top so they don’t spill over while baking (because nobody likes a messy cheesecake).
- Bake time! Place the pan in the oven and bake for 18–20 minutes, or until the centers are just barely set (they should still jiggle a little—use a spatula to test gently). Carefully remove the pan and let them cool completely at room temperature. Don’t forget to refrigerate them for at least 2 hours so they set to the perfect texture.
- Now let’s make the ghosts! In a chilled bowl, whip the heavy cream with the powdered sugar until you see firm peaks form—you can’t miss it. In other words, when you lift the beaters, the cream should stand tall without collapsing.
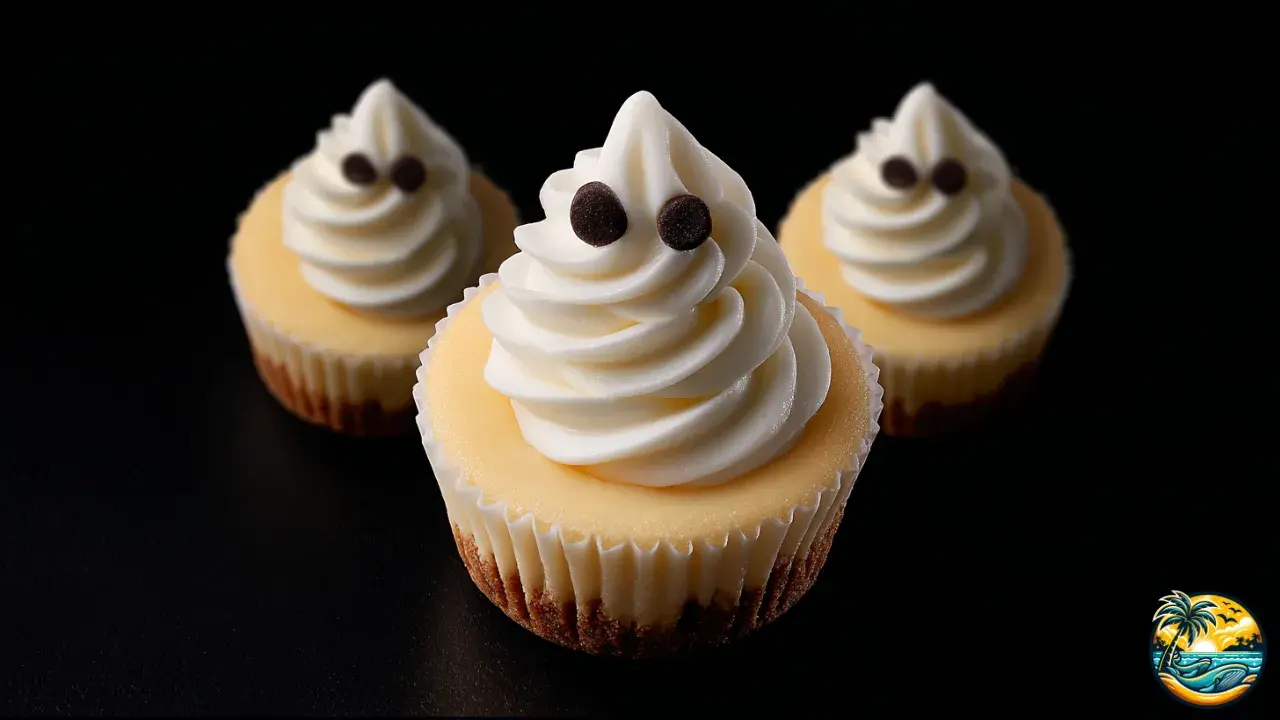
- Spoon the whipped cream into a piping bag fitted with a round tip. Pipe a tall spiral cone on top of each mini cheesecake to make a cute little ghost shape.
- Finally, add two mini chocolate chips as eyes for each ghost. And that’s it! You’ve got adorable Mini Ghost Cheesecakes, the perfect treat to wow everyone at your Halloween party.


Ingredient Substitutions
- Crust: If you don’t have Graham crackers, go with Oreo cookies for a darker, chocolatey base.
- Sour cream: You can swap this with plain, unsweetened Greek yogurt.
- Cream cheese: Feel free to use a low-fat version instead of regular if that’s what you need.
- Powdered sugar: If you’re out, just blitz regular sugar in the blender until fine.
- Decoration: No mini chocolate chips for the eyes? Try raisins or candy pearls instead.

Prep Tips
- Cream cheese: Take it out of the fridge at least 30 minutes ahead so it softens up nicely.
- Mixing: Don’t forget—don’t overbeat once you add the eggs, or the cheesecakes will crack.
- Cooling: Don’t skip the cooling time; it helps you decorate them neatly later.
- Decorating: Sure, you can use a plastic bag, but a piping bag with a round tip gives you ghosts with clean lines.
- Warm climates: If you live somewhere hot, pipe the ghosts right before serving so they don’t melt away.
Common Mistakes (What NOT to Do)
- Temperature: Don’t bake at a high temp, or they’ll definitely crack.
- Cold cream cheese: Don’t use it straight from the fridge, or your batter will be lumpy.
- Sudden cooling: Don’t yank them out of the oven right away. Leave them inside a few minutes with the oven off and door slightly open, or they’ll sink.
- Whipped cream: Don’t overwhip it, or you’ll end up with butter—and no cute little ghosts.
- Crust: Don’t use too much butter, or the base will turn greasy and soft.

Frequently Asked Questions (FAQ)
- Can I make them no-bake? Yes, you can use a no-bake cheesecake recipe and chill until set, but the flavor and texture will be different.
- Can I freeze them? Absolutely—just freeze them without the ghost decoration and decorate when serving.
- Best cookies for the crust? Graham crackers, Oreos, Digestive biscuits, or even Maria cookies work great.
- Can I use a sugar substitute? Yep—erythritol or powdered stevia work well for a lighter version.
- How long do they last in the fridge? Usually up to 4 days if kept covered.
- Can I make them in bigger molds? Yes, just bake longer—around 30–35 minutes.
- Can I add pumpkin? Totally, and they taste amazing. Just add pumpkin purée and warm spices for a fall vibe.
- Can I use canned whipped cream? Yes, but keep in mind it won’t hold its shape as long as homemade.
- Are cupcake liners a must? Not strictly, but they sure make unmolding easier.
- Can I prep them ahead of time? Definitely—it’s actually better since they set more as they rest.
Storing & Reheating
- Fridge: Keep your Mini Ghost Cheesecakes in an airtight container for up to 4 days, no problem.
- Freezer: Always freeze them without the ghost topping; wrap in plastic and keep up to 2 months.
- Thawing: Move them to the fridge the night before so they get their texture back.
- Reheating: Don’t heat them in the oven or microwave—they’ll lose that creamy texture and turn weird.

Serving Suggestions
- Pair your mini cheesecakes with a cold glass of milk.
- A cinnamon latte gives them a cozy, grown-up touch.
- Add a few fresh berries on the side for a nice tart contrast.
- A Pumpkin Spice Latte is the perfect Halloween match.
- And for an extra treat: how about pumpkin-shaped sugar cookies?
Recipe Variations
- Pumpkin Cheesecake: Perfectly fall! Just add pumpkin purée and pumpkin spice to the batter.
- Oreo Crust: Want a spookier look? Use crushed Oreos instead of Graham crackers for a darker, chocolate base.
- Mini Vampires: Go extra spooky—decorate with candy fangs instead of chocolate eyes.
- Red Velvet Cheesecake: Add red food coloring and a touch of cocoa powder for a bold, festive twist.
- Sugar-Free Version: Swap regular sugar for a low-calorie sweetener and still enjoy the sweetness.

Nutritional Information (per serving)
- Energy: 230 kcal
- Protein: 4 g
- Healthy Fats: 16 g
- Carbohydrates: 17 g
- Natural Sugars: 12 g
- Fiber: 0.5 g
- Sodium: 120 mg

Tastes of La Paz.
Mini Ghost Cheesecakes
Servings:12 mini cheesecakes
Prep Time: 25 minutes
Cook Time: 20 minutes
Total Time: 45 minutes
Ingredients
- 1 cup (100 g) crushed Graham crackers
- 2 tablespoons (28 g) melted butter
- 16 oz (450 g) cream cheese, room temperature
- 1/2 cup (100 g) sugar
- 2 large eggs
- 1 teaspoon (5 ml) vanilla extract
- 1/4 cup (60 ml) sour cream
- 1 cup (240 ml) heavy whipping cream
- 2 tablespoons (15 g) powdered sugar
- Mini chocolate chips or candy pearls for the ghost eyes
Needed Equipment
- Cupcake pan
- Cupcake liners
- Electric mixer
- Silicone spatula
- Piping bag with a round tip
Instructions
- So here we go! Preheat your oven to 325 °F (163 °C). While the oven warms up, place cupcake liners in your pan. This helps in two ways: first, the cheesecakes won’t stick, and second, they’ll look much nicer when serving—trust me, presentation counts!
- Now, in a small bowl, mix the crushed Graham crackers with the melted butter until the texture looks like wet sand—you’ll notice it right away. Divide the mixture into the cupcake liners and press it down firmly with the back of a spoon to create a solid base that will hold the filling.
- In a large bowl, beat the cream cheese with the sugar until smooth and lump-free (it’ll look delicious already). Add the eggs one at a time, mixing only enough to incorporate—seriously, don’t overbeat. Finally, mix in the vanilla and sour cream, which will give it that extra creamy flavor.
- Pour the cheesecake batter over the crusts. Fill each liner about 3/4 full, leaving just a little space at the top so they don’t spill over while baking (because nobody likes a messy cheesecake).
- Bake time! Place the pan in the oven and bake for 18–20 minutes, or until the centers are just barely set (they should still jiggle a little—use a spatula to test gently). Carefully remove the pan and let them cool completely at room temperature. Don’t forget to refrigerate them for at least 2 hours so they set to the perfect texture.
- Now let’s make the ghosts! In a chilled bowl, whip the heavy cream with the powdered sugar until you see firm peaks form—you can’t miss it. In other words, when you lift the beaters, the cream should stand tall without collapsing.
- Spoon the whipped cream into a piping bag fitted with a round tip. Pipe a tall spiral cone on top of each mini cheesecake to make a cute little ghost shape.
- Finally, add two mini chocolate chips as eyes for each ghost. And that’s it! You’ve got adorable Mini Ghost Cheesecakes, the perfect treat to wow everyone at your Halloween party.
Nutritional Information (per serving)
- Energy: 230 kcal
- Protein: 4 g
- Healthy Fats: 16 g
- Carbohydrates: 17 g
- Natural Sugars: 12 g
- Fiber: 0.5 g
- Sodium: 120 mg

Tastes of La Paz.